

Painting For Beginners: Part 1
April 2, 2019
Painting on a fresh new canvas or starting any project can be very intimidating. It may be overwhelming and difficult to know where to begin. Creating artwork is all about following processes and breaking your work down into steps.
It is important to start with the right materials depending on how you work and what you are trying to accomplish. Some types of paint are more forgiving than others, while some dry much faster than others. I have dabbled in multiple mediums and although I have a lot to learn about painting. I do have some insight on which mediums are best to start with and how to approach painting as a beginner.
Choosing Paints:
Watercolor & Acrylic
Watercolor and acrylic are inexpensive compared to other mediums, and they dry quickly. You don’t have to buy a ton of other materials to mix the medium with, like you have to do with oils. Watercolor is more translucent, while acrylic is thicker and more vibrant. I’d recommend starting with watercolor or acrylic for rookie painters, as they are much cheaper than oils and dry faster.
Oil Paint
For more experienced painters, or those who want to try painting with a more difficult but rewarding medium, painting with oil allows manipulation over long periods of time and the ability to create very realistic and smooth paintings.
There are other materials that are necessary or recommended to use with oils. You will need to buy turpentine in order to thin the paint and start with lighter levels, as well as to clean up your brushes. Linseed oil is also recommended, as it makes the paint more fluid, transparent, and glossy.
Additionally, while other mediums take minutes to dry, oil paintings can take multiple days to dry per layer. While this makes the painting time longer, it allows you to fix mistakes and add detail, as well as take your time and not feel as rushed.
Choosing Surfaces:
Another important step is deciding what surface to paint on, such as paper or canvas. If you use paper with oil, it is important to prime the paper first with gesso. You can and should also do this with acrylic.
The painting above was done with acrylic on paper. When painting, it is much easier to follow a process and do the art in layers, versus all at once.
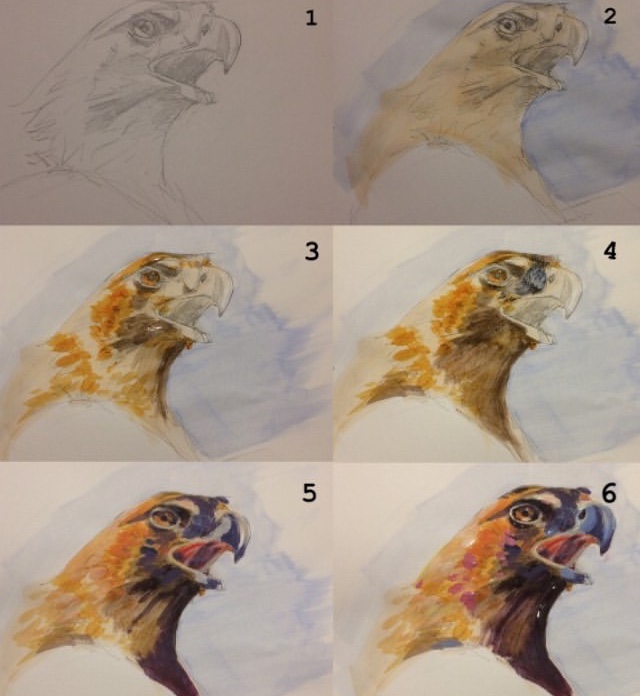
Step 1: I started by sketching out what I wanted to paint first. If using canvas with oils, take note that using pencil can smudge slightly into the paints. With oils, it’s best just to paint the outlines on first with very thinned out oil paint. In the case of this painting, I used acrylic, which you still shouldn’t use a regular pencil for to sketch, unless that is the only dry medium you have access to. It is recommended to use a water soluble pencil instead so that the graphite does not show through any layers.
Step 2: For the next step, I added local color in one single layer, over the painting, and added the background color. Local color is the regular color of the image/subject without any shading or lighting on it. It is important to paint very lightly and get thicker as you progress so that it is easier to fix mistakes. This concept is vital in oil painting, known as the fat-over-lean rule, as adding thin layers over thick ones will cause ones on the top to crack.
Step 3: After adding local color, the next procedure is to add details to the painting. This includes additional colors, and finer details.
Step 4: I added even more details, keeping in mind how thick I am laying the paint on.
Step 5: Then, I add value/shading, applying cool (blue, green, purple) colors instead of black. Black will wash out your painting and dull it, while using cool colors to shade preserves the image.
Step 6: For the last step, I add finishing details.